Technology for detecting residual stress in metals
2023-09-09 10:00Residual stress is one of the most important factors affecting the mechanical properties of components. It is necessary to reduce the harmful residual stress and predict the distribution trend and value of residual stress. In this paper, the non-destructive testing method of residual stress testing is introduced.
1 Ultrasonic method
Ultrasonic method is based on the propagation characteristics of ultrasonic waves inside the material, that is, the tensile stress causes the propagation time of sound waves to become longer and the sound speed to become slower, and the compressive stress is the opposite, and the stress is measured by the acoustic birefringence effect caused by stress. The change of sound velocity caused by stress change is very small, 100MPa only causes about 0.1% change in sound velocity. Critical refracted longitudinal wave (LCR) is a refracted longitudinal wave with a refracted Angle of 90 degrees, which is the most sensitive to stress and the most widely used. The stress calculation method of LCR wave is as follows:

The ultrasonic penetration ability is strong, and the residual stress inside the component and the table can be nondestructive detection, and the ultrasonic testing instrument is easy to carry, and can be used for outdoor and on-site measurement. However, the ultrasonic method needs to do calibration experiment when measuring stress, and it is affected by the thickness change of acoustic coupling layer between probe and component, the structure of component material and the ambient temperature.
2 X-ray diffraction method
X-ray method was proposed by Russian scholars in 1929. After years of development, the theoretical and practical measurement methods are relatively mature, and it is the most widely used nondestructive residual stress test method at present.
(1)Principle
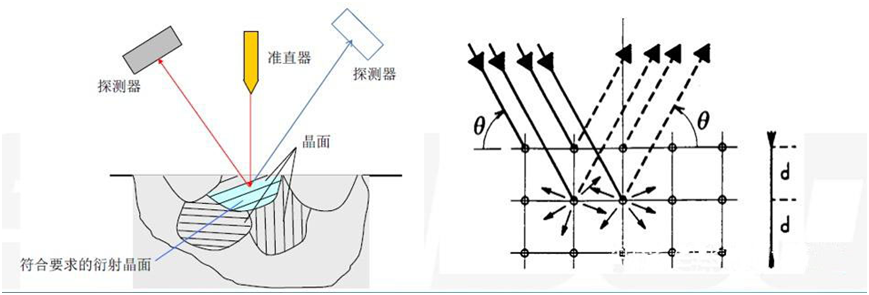
Residual stress measurement by X-ray diffraction is based on the theory of X-ray diffraction. When an X-ray of wavelength λ shines on the surface of a crystal, it receives the crest of the X-ray reflected light at a specific Angle (2θ), which is the phenomenon of X-ray diffraction. Among them, the diffraction Angle 2θ, the wavelength λ of the X-ray and the distance d of the diffraction crystal plane comply with the famous Bragg law: 2dsinƟ=nλ.


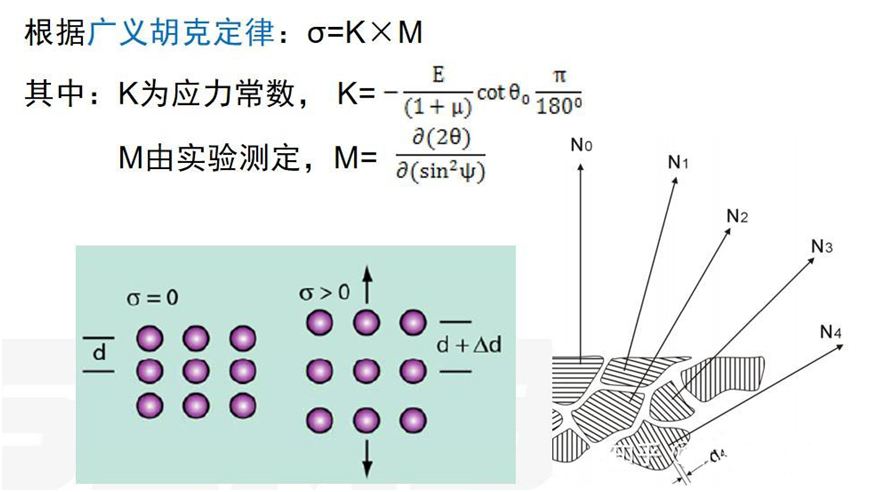
Where K is the elastic constant, when the wavelength of the incoming ray is selected (λ is certain), by measuring the diffraction Angle θ, the distance between the crystal faces after the stress can be obtained from the Bragg equation, and then the corresponding residual stress value can be obtained. It should be pointed out here that because the crystal is anisotropic, the elastic constant K is different from the elastic modulus E in the macroscopic sense, and the elastic constant K needs to be calculated according to the selected diffractive crystal plane.
In 1961, German scholar Macherauch combined elasticity theory and Bragg equation to propose the sin2ψ method for measuring two-dimensional residual stress:
According to the geometric relationship between the ψ plane and the 2θ scanning plane of the goniometer, it can be divided into two test methods: co-tilt method and side tilt method to accurately detect the surface stress of the workpiece.
3 Neutron diffraction method
The neutron diffraction method is similar to the X-ray diffraction method, but the neutron penetration depth is larger, so it can detect the residual stress distribution inside the bulk material (in the order of centimeters).The accuracy of the neutron diffraction peak is affected by the diffraction intensity, which mainly depends on the test time under certain conditions such as reactor power, diffraction crystal surface and gauge volume.
4 Magnetic method
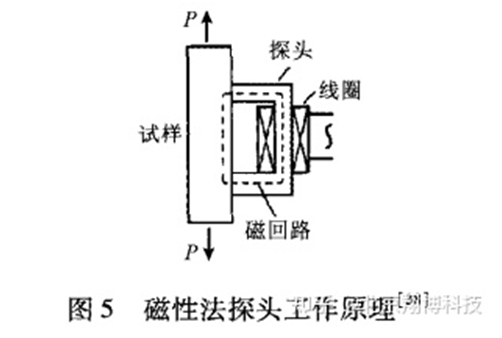
At present, there are two magnetic methods in use: magnetic noise method and magnetic strain method. The basic principle of magnetic noise measurement is to use the magnetostrictive effect of ferromagnetic substances. The stress will cause the change of the domain wall spacing of the ferromagnetic material, which will affect the strength of the signal emitted by Barkhausen. Magnetic strain method is to use the magnetic anisotropy of the material to measure the stress. When there is stress, the permeability will change accordingly. During the measurement, the magnetic resistance of the magnetic loop formed by the sensor and the surface of the material will change, and then the magnetic flux of the magnetic loop will change, as shown in Figure 5.

The magnetic strain method can not measure large residual stress (more than 300 MPa), and the relationship between stress and permeability is nonlinear. The magnetic method has small equipment, simple test steps and fast measurement speed, but it is difficult to directly measure the multi-point stress value, and can only measure the quantitative relationship between the principal stress difference at a single point and the magnetic measurement parameters.
In various industrial fields, the technology and application of residual stress testing have been highly valued, but there are few testing methods at present, and each testing method has certain limitations. At present, most of the applications are X-ray diffraction. As a non-destructive testing method, X-ray can only be measured in the thin layer of the surface, and the test surface requirements are high.
